| |
| Main Page |
| Blog |
| Search |
| FAQ |
| TOP 10 |
| Pad Files |
| Contact |
| About... |
| Donate |
| All Utilities |
| Password Tools |
| System Tools |
| Browser Tools |
| Programmer Tools |
| Network Tools |
| Outlook/Office |
| 64-bit Download |
| Panel |
| Forensics |
| Pre-Release Tools |
| Articles |
Related Utilities
DescriptionWhile watching a video in a Web site, you may sometimes want to save the video into your local drive, and then play it offline later. This utility allows you to capture .flv (Flash Video) files and RTSP/MMS video streams while the Web browser download and play them inside a Web page. After the entire video file is downloaded and played by the Web browser, the video file is saved in the folder that you selected, and you can play it offline later with any Video player.
System RequirementsThis utility works on Windows 2000/XP/2003/Vista. Older versions of Windows are not supported. Be aware that under Windows 2000/XP, WebVideoCap can only capture the video files if you log on as a user with admin rights.In order to use WebVideoCap under Windows Vista with SP1, you must download and install the WinPcap driver, and select the WinPcap driver as the capture method.
Versions History
Known Limitations
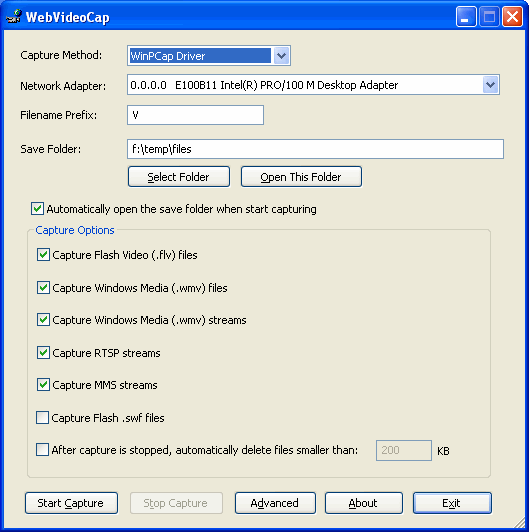
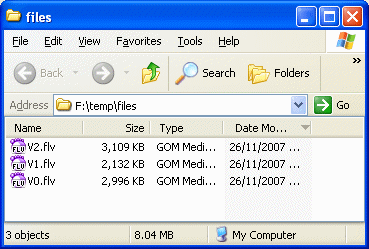
Using WebVideoCapWebVideoCap doesn't require any installation process or additional DLL files. In order to start using it, simply run the executable file - WebVideoCap.exe(However, if you have Vista with SP1, you have to download and install the WinPcap driver) After you run it, the main window of WebVideoCap is displayed. First, you have to select the folder that you want to save the captured video files. By default, the save folder is located in the 'files' folder under the folder of the executable file. If you have more than one network or dialup adapter, you should also select the right adapter. After that, you can click the 'Start Capture' button. While WebVideoCap is in capture mode, open your browser in a video Web page. If everything goes right, you should see a new video file created and grown inside the folder that you have selected. You can continue watching more Web site videos while WebVideoCap capture the video files in the background. After you finish, click the 'Stop Capture' button.
Playing The Video FilesMost Web sites today use Flash video files (.flv extension) for playing video inside the Web page.WebVideoCap doesn't provide a build-in video player, but you can use any flv player to play the video files that you captured with WebVideoCap. If you don't have a video player that can play .flv files, you may try one of the following freeware solutions:
Capture Buffer SizeStarting from version 1.17, WebVideoCap allows you to control the capture buffer size, in the 'Advanced' options window. In most cases, you should not change this value. However, if the files that you capture are corrupted, increasing this 'Buffer Size' value may solve the problem.
Keep the captured files opened until the capture is finishedIf you have a very fast Internet connection, and the files that you capture are corrupted even after increasing the buffer size, selecting this option should increase the performances of saving the video files to disk, and thus it may solve corrupted files problems.However, be aware that when you choose this option, the capture files will be remained open until you stop the capture process by clicking the "Stop Capture" button.
Translating WebVideoCap to other languagesIn order to translate WebVideoCap to other language, follow the instructions below:
LicenseThis utility is released as freeware. You are allowed to freely distribute this utility via floppy disk, CD-ROM, Internet, or in any other way, as long as you don't charge anything for this. If you distribute this utility, you must include all files in the distribution package, without any modification !
DisclaimerThe software is provided "AS IS" without any warranty, either expressed or implied, including, but not limited to, the implied warranties of merchantability and fitness for a particular purpose. The author will not be liable for any special, incidental, consequential or indirect damages due to loss of data or any other reason.
FeedbackIf you have any problem, suggestion, comment, or you found a bug in my utility, you can send a message to nirsofer@yahoo.com
WebVideoCap is also available in other languages. In order to change the language of WebVideoCap, download the appropriate language zip file, extract the 'webvideocap_lng.ini', and put it in the same folder that you Installed WebVideoCap utility.
|
|||||||||||||||||||||||||||||||||||||||||||||||||||||||||||||||||||||||||||||||||||||||||||||||||||||||||||||||||||||||||||||||||||