| |

|
CustomizeIE v1.01
Copyright (c) 2003 - 2008 Nir Sofer
|
Description
The CustomizeIE utility allows you to easily add, edit and delete additional
toolbar buttons and menu items in Internet Explorer. (Version 5.0 and above)
System Requirements
- Windows operating system: Windows 95/98/ME, Windows NT, Windows 2000, Windows XP and Windows Vista.
- Internet Explorer, Versions 5.0 - 7.0
Versions History
- Version 1.01 - Fixed the problems with Windows Vista/IE7.
- Version 1.00 - First release.
License
This utility is released as freeware. You can freely use and distribute it.
If you distribute this utility, you must include all files in the distribution
package including the readme.txt, without any modification !
Disclaimer
The software is provided "AS IS" without any warranty, either expressed
or implied, including, but not limited to, the implied warranties of
merchantability and fitness for a particular purpose. The author will not
be liable for any special, incidental, consequential or indirect damages
due to loss of data or any other reason.
Using the CustomizeIE utility
The CustomizeIE is a standalone executable, and it doesn't require any
installation process or additional DLLs. Just run the executable, (ctie.exe),
and start using it.
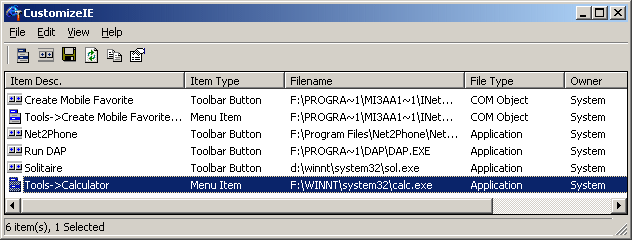
The main screen of CustomizeIE displays all current additional menu items
and toolbar buttons of Internet Explorer. Be aware that some menu items and
toolbar buttons are created by other applications, like "Download Accelerator",
"iOpus Internet Macros", and others. You can also modify the settings of these
buttons and menu items, although it's not recommended.
Adding menu items
In order to add a new menu item to Internet Explorer, follow the instructions below:
- From the File menu, choose "New Menu Item", or simply press Ctrl+M.
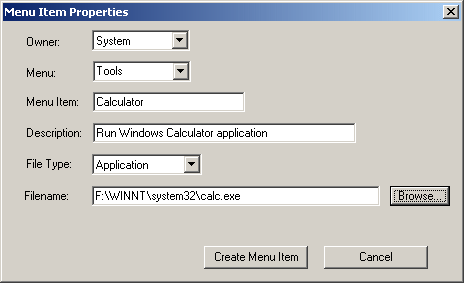
- In the "Menu Item" window, fill the following fields:
- Owner: System or User. If choose "System", the menu item will be added for
all users in your computer. If you choose "User", the menu item will
be added only to the current logged on user.
- Menu: Select under which menu your item will be added: Tools Or Help.
- Menu Item: Type the name of you menu item.
- Description: Type the description of you item. The text you write here will
appear in the status bar when your menu item is highlighted.
- File Type: Select Application or Script (The third option is not supported).
- Filename: Select a filename. If the file type is Application, you should
type a full path of an application that you want to run when the menu item
is selected (For Example: f:\winnt\system32\calc.exe)
If the file type is a script, you should type a full path of a script file.
For more information about scripts, read below.
- Finally, press the "Create Menu Item". In order to see your new menu item,
you should close Internet Explorer and then reopen it.
In the following example, the calculator application is added to the Tools menu of Internet Explorer:
Adding toolbar buttons
In order to add a new button to the toolbar of Internet Explorer,
follow the instructions below:
- From the File menu, choose "New Toolbar Button", or simply press Ctrl+T.
- In the "Toolbar Button" window, fill the following fields:
- Owner: System or User. If choose "System", the button will be added for
all users in your computer. If you choose "User", the button will
be added only to the toolbar of the current logged on user.
- Caption: The text you write here will be shown under the toolbar button
(only if IE is configured to show text labels in the toolbar)
- Default Icon / Hot Icon: In these fields, you should select the icons that
should be displayed on your toolbar button. You can select an icon file (.ICO)
or an icon resource in executable file (*.exe, *.dll).
For more information about the icons in toolbar buttons, read below.
- Visible: Choose 'Yes' if you want that the button will be visible by default.
- File Type: Select Application or Script (The other options are only
for professional programmers, and they are currently not supported by
this utility.
- Filename: Select a filename. If the file type is Application, you should
type a full path of an application that you want to run when the button
is pressed (For Example: f:\winnt\system32\calc.exe)
If the file type is a script, you should type a full path of a script file.
For more information about scripts, read below.
- Finally, press the "Create Button". In order to see your new button,
you should close Internet Explorer and then reopen it. If you still don't see
your button in the toolbar, try to enable it in the "Customize Toolbar"
window of Internet Explorer.
In the following example, a button that runs the Solitaire game is added to the toolbar of Internet Explorer:
...and the result:

Modify/Delete existing buttons and menu items
In order to modify existing item (menu or button), double-click on the desired
item, and modify the item's properties as you wish.
In order to delete an item, select the desired item and press the 'Del' key.
Using scripts
If you have a knowledge in Javascript, you can write scripts, and execute them when
you press a button or when you select a menu item.
You can also use this feature for opening a specific Web site when you press a button or
select a menu item: The "script1.htm" (attached to this utility) opens the Google
Web site in a new window. You change the Web address in the script to the Web site
you need, and use it in buttons or menu items you create.
Using Icons
When you create a toolbar button, you have to select 2 icons to display in the
toolbar button:
- The default icon: This icon is usually painted with gray scale colors.
- The hot icon: This icon is usually colorful, and it's displayed when the mouse
cursor moves over the button.
In order to get the best results, each icon should contain 2 types of images:
- 16 X 16 pixels with 16 colors.
- 20 X 20 pixels with 256 colors.
You can use the sample icons attached to this utility in order create your buttons,
and learn how to create you own icons:
For the default icon: icon1.ico, icon2,ico, icon3.ico
For the hot icon: hoticon1.ico, hoticon2,ico, hoticon3.ico
For more information about designing icons for the toolbar buttons of Internet
Explorer, you can read the following article in Microsoft Web site:
Toolbar Button Style Guide
Feedback
If you have any problem, suggestion, comment, or you found a bug in my utility, you can send a message to nirsofer@yahoo.com
|
|